Wednesday, February 8, 2012

Sprouting: Day 3

Day 3
Day 3!  Lots of action today.

I once again rinsed & drained my little seeds, once in the morning & again in the evening.  Swirling the water around in the jar to ensure each little seed was washed.  My seeds are growing - starting to fill up the jar, some of the green skins/hulls have completely fallen off and little white tails are starting to make an appearance - kinda looks like tadpoles!

Very Exciting - Day 4!
The Hoff

Tuesday, February 7, 2012

Sprouting: Day 2

Day 2
Day 2 into my sprouting experience and I have once again rinsed & drained my sprout seeds and left the jar titled upside down in order to allow an excess water to drip out & air to flow into the jar.  The rinsing is very important because you are getting rid of any bacteria that could lead to mold.

Not much of a change today, other than the little green skins have broken apart to expose the white seed they were covering.

Till Tomorrow - Day 3!
The Hoff

Monday, February 6, 2012

Sprouting: Day 1

Day 1
As you know from my previous post, I have decided to take on sprouting as my next challenge!

I'm going to chronicle my experience, to give you an idea of what to expect on your sprouting adventure.

So, this is Day 1.

I have decided to start with Mung Bean Sprouts, because I have read that they are pretty hardy and difficult to screw up.

Following the directions on the package of my seeds, I rinsed 4 tbsp of Mung Bean to ensure all dirt or soil was removed and there were no tiny stones.  Tossed those into my glass canning jar and covered it with water.  Actually, you only need to go above the seeds with a 1/2" of water, but I wasn't taking any chances so I filled up the jar!  I used room temperature Spring Water for this, for no particular reason.  Filtered tap water would be just fine as well.

I placed the jar out direct sunlight and let it soak over night.

In the morning, I dumped the water, using the handy screened top and then rinse the seeds with running, filtered tap water.  Swirled the water around a bit and then dumped it all out, shaking the bottle to get every drop out.  I then left the bottle upside down at a 45 degree angle in my dish rack, again, out of direct sunlight for the entire day.

When I returned home from work, I repeated the "washing" ritual from the morning and let the bottle sit and drain overnight.

Can wait to see what tomorrow brings...Day 2!
The Hoff

Sunday, February 5, 2012

Sprouting: What Is It?

Recently, I have discovered the magical world of Sprouts and the art of Sprouting!  I was blown away by how something so tiny and so simple to grow, could deliver such a powerhouse of nutrients and health benefits - truly amazing!

Sprouting is simply soaking seeds in water and then allowing them to germinate until the very first signs of plant growth appear.  Then you eat them - super simple!

I personally never buy alfalfa sprouts from the grocery store due to an unusually high incidence of E. Coli, salmonella and  listeria contamination.  That and sprouts, even organic, are commonly sprayed with chlorine or food grade hydrogen peroxide to prevent mold and extend their very short self-life.

Benefits of Sprouts

Due to the numerous enzymes, sprouts are rich in easily digestible energy.

They are abundant in antioxidants, full of protein, chlorophyll, vitamins, minerals and amino acids.  Chlorophyll is the ultimate blood purifier, intestinal cleanser and removes toxins from the body - in fact sprouts are nature's great cleaner!

Sprouts contain beneficial fiber.

Sprouts are very alkaline and can help balance the body.

It's best to eat sprouts raw to preserve all their beneficial nutrients.

Each different type of sprout comes with it's own unique benefits, but just to give you a perspective of the type of health benefits you can expect, one ounce of Broccoli Sprouts is the same as 3 pounds of Broccoli from a nutrient standpoint!  How is this possible?  Well, each sprout has the complete nutritional makeup of a full grown vegetable and one ounce, about the amount that fits in the palm of your hand is about 100 sprouts.  So when you eat one ounce of sprouts, when it comes to all the nutrients, vitamins and minerals you are eating 100 vegetables!

Sprouting Is Cheap!

Fancy equipment although available is so not necessary for sprouting.  Canning jars are a popular and cheap choice to grow sprouts.  You can use a fancy plastic lid with a built-in mesh screen to aid in drainage or make your own.  Sprouting seeds are cheap when you think about how much you can grow with just a few tablespoons of seeds.  And water, everyone has access to that!  That's really all you need to sprout.  Google sprouting and you will find all kinds of websites eager to help get you started, such as Back Yard Nature.

I Don't Have Time!

Yes you do.  Sprouting requires minimal time and effort.  Once you have rinsed and soaked your seeds, simply rinse with water twice a day.  Within 3 - 6 days, you have sprouts!

I Kill Plants!

So do I, but trust me, sprouting is so simple that you & I can do it! We really just have to get the process started and the sprouts take care of the rest. Mother Nature, go figure!

Getting Started

One good source for organic sprouting seeds is MountainRoseHerbs.com.  You can buy in 4oz, 8oz or 1lb increments.  Seeds can start at $2 and go up to $24 depending on which variety and how much you want. 

Canning jars are the typical go-to vessel for sprouters and can be found at Walmart and perhaps even your grandparent's basement.  Make sure you get the wide mouth opening in at least the quart size.  If you want a bigger jar (half gallon), you may have to buy online from Ball or Amazon.  Although, I have heard this size can be found at a hardware store.

You can buy sprouting lids, which come in metal or plastic.  Make sure to get the plastic as the metal are prone to rust.  You can also make your own lid using a rubber band and anything that will allow water to filter through and air to circulate in - some common materials used: cheesecloth and nylon.    If you are prone to fruit flies in the summer months, an alternative screening solution will work better than the ready-made lids.

Or just buy a sprouting kit!  I got mine kit from The Wellness Forum.  They don't have online ordering, so you have to call to place an order - 1.800.761.8210

The kit is $45.95 and includes everything you need to get started: 2 quart glass canning jars, 2 sets of lids (3 each with varied size screens), one pack of Mung Bean, Radish & Broccoli seeds.

Sprouting Is Easy!
  1. Rinse seeds
  2. Soak seeds overnight
  3. Drain and rinse seeds again, keep jar at a 45 degree angle to allow water to drip out and air to flow in
  4. Repeat Step 3, twice a day - once in the morning, once at night
  5. After 3-6 days, (depending on type of seeds) sprouts are ready to eat
  6. Expose to sunlight for up to 15 minutes, allow to dry and store in frig for up to a week
Best of all, there is no "right season" to grow sprouts, you can do it anytime of year.  Which means, when the cold, cruel snows bury us, we can still have fresh veggies whenever we want!

Storage

Sprouts can be kept in the frig for up to two weeks.  Just make sure to keep them dry.

You Grew Them, Now What?

Let the eating extravaganza begin!  Eating sprouts, due to their size, is the equivalent of eating hundreds of full grown plants!

Use them in:
  • Salads
  • Sandwiches
  • Wraps
  • Soups
  • Smoothies
  • Juices
  • Stir-fry's
  • Side dish

Check out this cool YouTube video, courtesy of Dara of Live Love Raw for more info & inspiration!


Go Sprout!
The Hoff

Saturday, February 4, 2012

Quinoa

Quinoa, pronounced as KEEN-WAH, is actually a seed, not a grain - a common misconception. However, it is prepared and used in the same manner as rice or couscous.

Once prepared, Quinoa is light and fluffy, making it fun to eat!  It is about the same size of couscous, brown in color and has a slight nutty flavor.

Since Quinoa contains a balanced set of essential amino acids, it is considered a complete protein source.  It also provides a good source of fiber, phosphorus, magnesium and iron.  Plus, Quinoa is gluten-free and is very easy to digest.

Preparation is super simple and quick! 

Cover 1 cup of Quinoa with 2 cups water or vegetable broth, bring to a boil, cover & reduce to simmer, cook for 15 minutes.  Let sit for 5 minutes before fluffing with a fork.  Add seasonings and veggies to enhance!  Toasted pine nuts and caramelized onions are an excellent compliment to this tasty treat.

Try it!

Thursday, February 2, 2012

Hoff Hit: Muscle & Fat

Muscle burns fat in your sleep - in your sleep people!  Hit the weights!

Wednesday, February 1, 2012

Pam Cooking Spray Scam!

This post was inspired by a lecture given by Jeff Novick, "When "fat free" really means 100% fat."

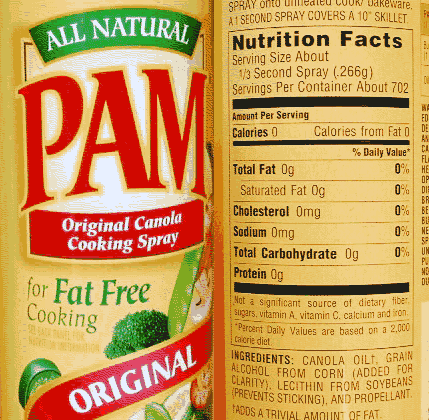
Pam Cooking Spray is Fat Free and Calorie Free, right?  The label says it is, so it must be true!

Sorry folks, Pam lied to you - how dare she!

Pam Cooking Spray is made with pure oil, which is concentrated fat and calories, so how did she get rid of the fat and calories?

Well, the FDA helped her out.  By FDA labeling standards, if something is less than .5 grams per serving, then the product can "claim" that it's not there.  But it is there, because .5 grams is something and very few of us actually use the recommended serving size and in the case of Pam Cooking Spray, it is impossible to use only the recommended serving unless you are a super ninja.  (Are you a super ninja, because I'd really like to meet you!)

To give you perspective, .5 grams of this spray is the size of a molecule - a molecule, people!

Allow me to explain...

A serving size for Pam Cooking spray is 1/3 of a second of spraying time.  Are you kidding me?!?  Again, only a super ninja can do something 1/3 of a second!  Don't you find it odd that this can has 702 servings?!?  And lets be honest, when we get those cans in our hands we turn into graffiti artists, coating the surface until it shines!

What can you do?

You can stop yourself from being duped by reading the ingredients label.  Because, while the FDA will allow a product to make false claims on the front of the packaging, the back of the packaging has to come clean.  Full disclosure, for the most part, with the ingredients label (beware of "natural flavorings").  So when a product claims to be trans-fat free, you'll know better when you see partially hydrogenated oil among the list of ingredients.

Too funny not to share...

Observe that this Smart Balance can to the right states that it is "Fat Free", yet it contains the "Right Balance of Fats".  Now, I went to college and even I don't get how that's possible.  And since when does fat help cholesterol?

Stop the Lies!
The Hoff